Blackberry Vinaigrette

In the past few weeks I have seen some delicious berry vinaigrettes.  Raspberry-Honey Jalapeño and  Sunny Honey Vinaigrette to name a couple of my favorites.  Plus Chris’ blog has so many delicious recipes, you cannot just like one thing.  I must have 89 recipes pinned on Pinterest from her blog alone.

My Mom and I had picked some of my blackberries one day.  We had picked quite a few and we both found things to do with them.  Ice cream topping, muffins, pies.  Still I had more to pick soon.  Would you look at the size of these blackberries!  And yes guys, that is my hand and not a child’s hand…lol!
blackberries
blackberries
I was able to pick some more a week or two later and really wanted to make a blackberry vinaigrette.  I was almost craving it.

I had a couple friends over last Saturday and instead of cooking we had pizza and salad takeout.  I did make the blackberry vinaigrette though because I was craving it.  It went over well, they liked it and so did I.  In fact, I enjoyed it for the next 3 days as well!

Blackberries are most likely still available to you, especially my southern friends.  I would highly recommend making this dressing.  It was so refreshing, so tasty and for some of us, that last hold we have on summer 🙂

I looked up recipes and within a few tries, came up with my own. Feel free to add less or more of any ingredient.   I had fun coming up with this and will make it again…next year.  My berries are all done.  Salute to summer!

Blackberry Vinaigrette

1 c. fresh blackberries
1/4  c. balsamic vinegar
1 t. Dijon mustard
3/4 t. minced garlic
1 T. agave nectar (or honey)
slightly less than a half cup of olive oil
salt and fresh cracked pepper to taste

In a blender or food processor add all ingredients except the olive oil. Blend until smooth.  Slowly add in the olive oil through the top and blend until smooth again.
blackberry vinaigrette

Strain mixture through a sieve (optional) to remove all seeds. Taste to see if more salt or pepper is needed.  If you want it sweeter add a little more agave or honey.
blackberry vinaigrette

Enjoy!  Have a wonderful weekend y’all!  🙂

Posted in Condiments/sauces/etc., Salads | Tagged , , , , , , , , | 37 Comments

Sticky Chicken

If you’re looking for a last minute, easy recipe, that is sure to please a crowd for Labor day weekend, I have one for you.  Baked chicken thighs in a sticky-sweet barbecue sauce.  If you can look past my pictures, it truly is a great dish.  I promise.  Even pinky swear!

This is from the Looneyspoons Collection cookbook, page 167 if you have it.  If not, I did not change any ingredients, besides cutting it in half because I wasn’t feeding a crowd at the time.  Although, my husband can be considered a crowd the way he eats 😉  That is, if he likes and he did.  I was shocked but, happy too.  High-fives for me!

Let’s get to cooking…

Sticky Chicken

16 boneless, skinless chicken thighs
1/2 c. barbecue sauce (hickory flavor works great!)
1/4 reduced-sodium soy sauce
1/4 c. red wine vinegar
1/4 c. pure maple syrup or honey (I used honey)
1 T. chili powder
1 T. Dijon mustard
1 T. grated gingerroot
2 t. minced garlic
1 t. ground cumin
1 T. cornstarch

Preheat oven to 400 degrees.  Spray a 9 x 13 baking pan with cooking spray.  Arrange chicken thighs in pan in a single layer.
sticky chicken

To make sauce, whisk together remaining ingredients, except cornstarch, in a medium bowl.  Pour evenly over chicken.  Turn pieces to coat both sides with sauce.  (I marinated mine overnight, at this point). Bake, uncovered, for about 40 minutes (or less, if using less pieces), or until chicken is no longer pink in the center.

Remove chicken from pan and keep warm.  Carefully pour sauce from pan into a small pot.  Bring to a boil over medium-high heat.  Combine cornstarch with an equal amount of water and mix until smooth.  Add to sauce.  Cook until sauce is bubbly and has thickened, about 1 minute.  Serve hot chicken with extra sauce on the top.
sticky chicken

*Here are the minor changes I made while cooking.  I cooked the chicken on a cookie sheet to spread it out more.  While the chicken was cooking I made the sauce, I basted the chicken while it cooked.  That is probably why it looks black in my pictures and probably why my kitchen was full of smoke.  The sauce wanted to cook faster than the chicken.  If I made this again, which I will, I would most definitely cook this on the grill and save the sauce for last.  As stated in the recipe to begin with.   Why oh why do I alter things some times?  Lol!
sticky chicken

All in all, the chicken was great and very moist, the sauce was very good and not burnt, even though looks can be deceiving from my wonderful pictures.  Don’t be jelly of my photos either 😉

Have a great Labor day weekend y’all, stay safe and enjoy!

Posted in Main dishes | Tagged , , , , , , | 20 Comments

Carolina Coleslaw and a couple of crafts

So it’s been over 2 weeks since I’ve posted anything.  Nothing bad going on, just summer time and enjoying time in the great outdoors, by the time I do come in I either watch some tv or I play on Facebook and get lost in the craziness I find there.   I do love being outside though.  I’ve been stocking up at yard sales and flea markets on mason jars (I have a craft addiction to these things) and vases.  I made some Christmas vase centerpieces last year and they sold well so I’d like to do it again.  I might as well start getting supplies early.  Even though I do not want to hear or type Christmas again!

So for a bit of summer fun to add to the picnic table, garden or landscape I made these two mason jar crafts.  Once again, both of them my Pinterest finds.  The first is a watermelon jar. These are super simple, here’s how to make them…
watermelon jars
You will need some Crystal Gloss Enamel paint.  Shown is red and green and regular black acrylic paint.  A small paint brush and some cotton balls or a foam brush.  (I used both and like the foam brush the best but, this was the only picture I had).
watermelon jars
Paint the top of the jars red, leaving about 3/4″ to an inch of clear at the bottom of the jar.  The picture looks pink but, that is one coat.  I did two coats and you can see the difference in the next picture.
watermelon jars
Once that is dry, maybe an hour or so.  Paint the remaining clear part green.  Again, I did two coats.  Let dry 48 hours and then bake as instructed on the back of the gloss enamel paint bottles.  This is paint specifically used on glass to dry colorful and translucent.  I love the stuff!

Once they are out of the oven and cooled, you can add the black dots onto the red portion to mimic watermelon seeds.  I had all different shapes and sizes, just have fun with it!  Let the black dry and you’re ready to use them.  Just add a tea light and enjoy!
watermelon jar
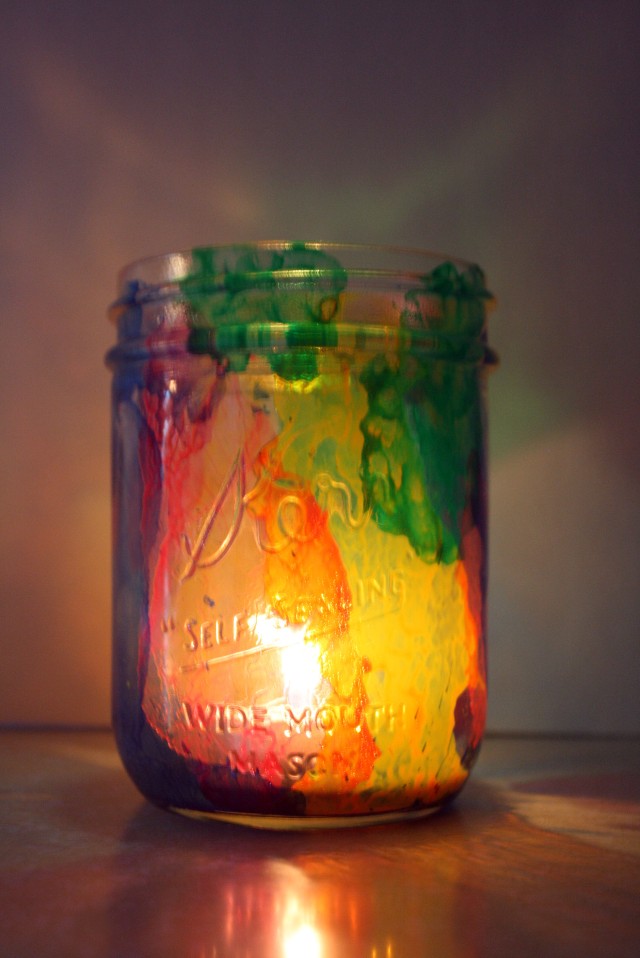
The next jars I created were splatter jars.  These turned out cute and bursting with color.  Once again, very easy and you can choose what colors you want.  Two-tone, jewel-toned or go rainbow style like I did 🙂

You’ll need the same gloss enamel paint as stated above in whatever colors you choose.  Next, you’ll need a can of Dusting Air, the stuff you use on your computers, tv’s, etc. it looks like this…
Dusting air
Add a little paint to the side or bottom of the jar.  Then spray the paint with the the dusting air to spread it out and create a “splash” of color.  Do this with your remaining colors to combine the paints and make colors blend.  Let dry and bake as directed on the back of the gloss enamel paints.  Once cooked and cooled, add a tea light and you have a colorful piece for your table setting, yard, etc.
Splatter jar

Splatter jar
Can you tell I love lights and color?  They scream summer too me.  My (long) driveway and pool path are lit with solar lights but, I like lights here and there and everywhere too 😉

Okay funny side story, I was using the Dusting Air for the splatter jar and it ran out about halfway through!  I thought of using the husband’s air gun but, figured the jar would go flying and shatter into a million pieces.  I was determined to fix it though and finally used a cigarette lighter thingy that I have to blow up air mattresses.  Ha!  It worked fine and I felt like a genius.  For a minute…Ha!

So, now I will shut up and get to the food.  The hubs will not touch a mayo based coleslaw and I was determined to put some slaw on our smoked chicken sandwiches so I found this recipe and tweaked it to my liking.  It’s vinegar based and we both liked it.  Yes, both of us.

Caroline Coleslaw

1 large head of cabbage, finely shredded
1 medium bell pepper, finely chopped
1 medium sweet onion, finely chopped
2 carrots grated

Dressing

2 T. sugar
1 t. salt
1 t. dry mustard
3/4 t. celery seed
1/2 c. vegetable oil
3/4 c. apple cider vinegar

Combine cabbage, bell pepper, onion and carrots in a large bowl.

In a saucepan over medium heat, combine remaining ingredients; bring to a boil.  Simmer, stirring, until sugar in dissolved; pour over vegetables and toss well.  Cover and refrigerate until throughly chilled.

Carolina Coleslaw

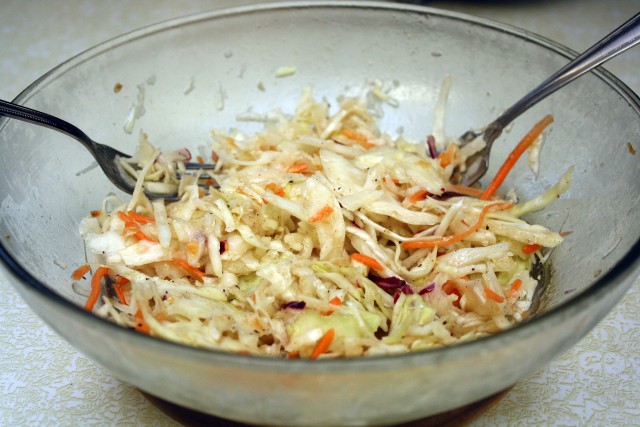
Makes 8-10 servings.  (If my picture looks like less, I did cut the recipe in half for us).  Original recipe found here.

We had this, as I said on our smoked chicken sandwiches and it was really good.  I don’t have any pictures of our sandwiches…guess we were too hungry but, I did get one of the smoked, bbq chicken.
Smoked bbq chicken
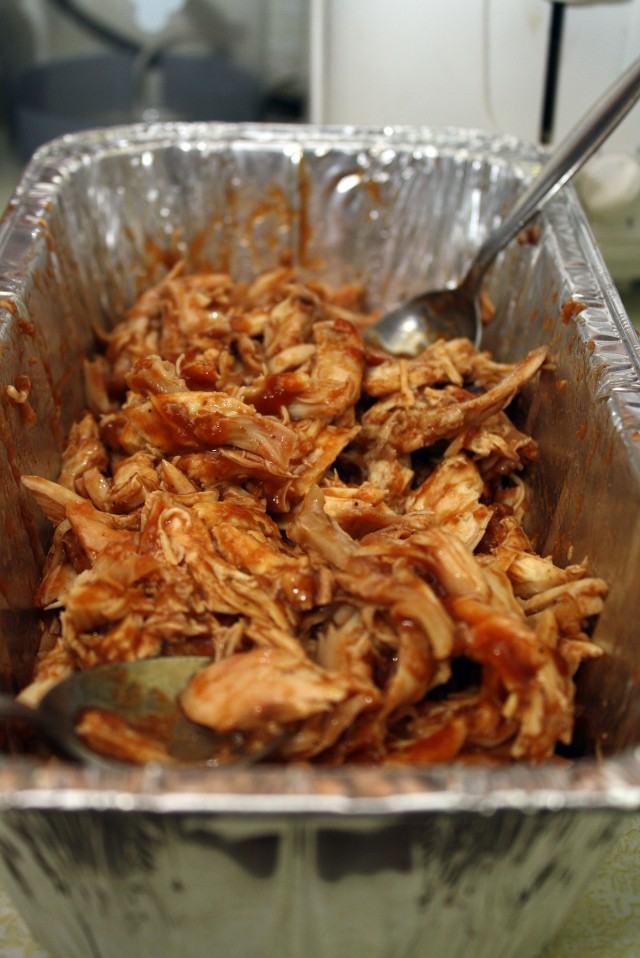
It was so good!  Try this while we still have a little bit of summer left.  Have a great weekend y’all and enjoy the nice weather a bit longer 🙂

Posted in Projects, Salads | Tagged , , , , , , , , , , , , , | 38 Comments

Basic Crab Cakes

There are all kinds of crab cake recipes on the internet but, if you want a basic, easy recipe you’ve come to the right place.  With some recipes I like to get a little more fancy and with other things I like to stick to the original.  I mean really, I’m not Martha.

My daughter-in-law, (Crissy), was here for a visit and wanted to learn how to make crab cakes so I introduced her to a basic recipe.  After that, you can add what you like and switch things around to your taste.  Personally, when it comes to crab cakes I like to stick to the basics, after all it is a crab cake.  You want to taste the crab right?!?

You would have thought in two weeks time, that Crissy and I would have cooked up a storm because we both enjoy cooking.  The truth is she was taking care of baby so I cooked a few nights.  She made a delicious meal another night. (Husband approved).  The crab cakes we did together and some nights we swam in the pool and forgot dinner altogether just to have adult time and enjoy each other’s company.  The last night she was here (it was going to be a busy morning) we ordered pizza, salad and breadsticks and didn’t worry about it!  I’m pretty sure she enjoyed her stay because nothing was rushed or hurried, we just enjoyed ourselves and each other’s company.

Our visit was wonderful and the two weeks flew by!  I took last week off of  blogging just to rest (so not used to a babe in the house, even though he was a great baby) and to get my house/garden projects caught up.  My grandson is just so adorable it takes my breath away!!  So, here is the recipe and a few pics of myself and lil man.

Crab cakes

1 (16 oz.) can Van Camp’s Crabmeat – pick out any shells
1 beaten egg
2 T. mayonnaise
1 T. prepared mustard
1 t. Worcestershire sauce
1 t. dry mustard
2 t. Old Bay seasoning
1/2 t. lemon juice
hot sauce (optional)
3/4 c. bread crumbs (I used Italian, use what you prefer)

Mix everything into a large bowl except the crabmeat.  I just used my hands to mix everything.  Add the hot sauce if you wish (I wished…ha!). Hot sauce is to your taste.

Next fold in the crabmeat gently with your hands or a wooden spoon.

Form into patties, this made 6 generous patties.  Save in an airtight container in the refrigerator if not making 6 patties at that time.

Heat a large non-stick skillet on medium heat and add a pat or two of butter.  Once the butter is melted add your crab patties.  Cook until browned on each side, 4-5 minutes on each side approximately.
crab cakes

Plate and serve with a side salad or whatever your heart desires.  We had a caesar salad with pasta and it was perfect for a summer night!

Here are a few pics of myself with my beautiful, happy-go-lucky grandson…gosh do I miss him already!!
gma and lil man
He is so chillin’ in the pool here…it was 95 degrees and he had had enough of the heat!! He’s a Texas boy ya’ know, he’s not used to the MI muggy heat!
gma and lil mangma and lil man
gma and lil man
gma and lil man
He’s so giggling here…I wish I would have gotten a better view.  He’s like grandma….”A bikini…seriously?”  ha ha ha!!!!
gpa and lil man
And I can’t forget a picture with grandpa!! 🙂  He’s like Gramps…”I ain’t too sure about you”…lol!  Grandmama, “Get your beehind back here and put that camera down!”  Have a great week y’all!  xoxo

Posted in Main dishes | Tagged , , , , | 34 Comments

Rhubarb Lime Sorbet

I can’t believe it but I’m still using my ice cream machine.  I used it a lot last summer but then I tend to forget about things or just not feel like using them again.  The machine is so simple though and you have ice cream, sorbet or frozen yogurt in no time at all.  You do not need an ice cream machine to make this though I will go into more detail at the end.

First you need to make rhubarb simple syrup.  Original recipe from my friend Suzanne found here.  I slightly adapted things.

Rhubarb Simple Syrup

3 large stalks of rhubarb, cut into 2 inch chunks
1 c. sugar
1 c. water
Juice of half a lemon (approximately 2 T.)

Add everything to a medium size saucepan and bring to a boil, reduce heat to medium-high and cook at a low boil for about 10 minutes.  You want the rhubarb to be very soft.  I took a potato masher and smashed the rhubarb while cooking it.

Turn the heat off and let sit for 10 minutes.  Strain into a clean jar.  Using the back of a large spoon smash the rhubarb to get every last bit of juice.  Put your lid and band on.  Put in the refrigerator and it will self seal until you are ready to use it.  (If you’re not using it in the same day).

Rhubarb Lime Sorbet

Zest of one lime and juice of two limes
1 c. water
1 1/2 c. rhubarb simple syrup
2 T. light corn syrup
3/4 c. ice water

Mix together the lime juice and zest, 1 c. water, rhubarb simple syrup and corn syrup in medium size bowl.  Place in the refrigerator for about 30 minutes, while your 3/4 c. ice water is chilling in the freezer.

Turn on your ice cream maker and pour ingredients into your maker, add the additional 3/4 c. of ice water after about 2 minutes.  Freeze according to manufacturer’s directions.  Mine took about 22-23 minutes.

Immediately scoop into a air-tight bowl or container, cover and put in the freezer for 3-5 hours to ripen.

No ice cream maker?  No problem, you can still make some scrumptious sorbet.  Place mixture into an 8 x 8 glass dish and freeze.  Every half hour or so you’ll need to scrape the ice with a fork, but eventually you’ll get to the point where you have some nice flaky rhubarb lime sorbet.
rhubarb lime sorbet

My picture doesn’t really do this sorbet justice but, it is so refreshing and perfect for summer days.  I like to put two large scoops in a tall glass, add a small can of sierra mist, put in a straw and tall spoon.  That is my favorite way to have it.  So good and even better poolside 🙂

I’m off to Ohio this morning to take Crissy (daughter-in-law) to visit her relatives.  I will be back to visit your blogs on Friday.  Take care friends and wish me lots of luck saying goodbye.  I so want to kidnap these two!!  Here are a couple more pics to enjoy.
Saginaw zoo lil man

lil man

Have a great week y’all!

Posted in Treats | Tagged , , , , , , | 24 Comments

Jack Daniel’s Glaze

I have seen a few recipes for Jack Daniel’s glaze.  I found this one on Pinterest and it sounded good to me.  I kept seeing this delicious looking burger on the TGI Fridays commercial and after so many times I could not take it anymore.  I had to create that burger and Jack Daniel’s glaze to satiate my craving!

I have not been to TGI Fridays to actually taste their glaze, so I can’t tell you if it’s an exact replica or if it’s just close.  To me it doesn’t matter because it was good!  It was also husband approved…highly approved.  I also used it on grilled chicken and it was just as good.  You could also use it for a steak or shrimp marinade too.  Or you could dip a piece of bacon in it…just sayin’ 😉

This recipe makes one pint jar.

Jack Daniel’s glaze

1 c. dark brown sugar
1/2 c. Jack Daniel’s whiskey
1/2 c. soy sauce
1/2 c. ketchup
1 heaping tablespoon of steak sauce (I used homemade A.1 sauce)
1 heaping tablespoon of Sriracha hot sauce (or your favorite)
3 t. apple cider vinegar
2 t. bacon drippings
2 t. garlic powder
1 t. onion powder
1 t. paprika
1/2 t. chipotle powder
pinch of cayenne pepper

Combine all ingredients in a medium size saucepan.  Simmer until slightly thickened over medium-low heat for about 5 minutes. Stirring frequently with a whisk.
Jack Daniel's glaze

Pour into a pint jar leaving 1/2 inch headroom.  Put on the lid and band, place in the refrigerator and it will self seal.
Jack Daniel's glaze burger

If kept in the refrigerator I would say it would be good for at least 6 months but I don’t think it will last that long 🙂

Original recipe found here.

I’m still immensely enjoying my grandson and daughter-in-law’s company, I have one more week with them.  I know quite a few of you are not on my facebook, so I thought I’d share a few of my favorite  photos from our week together so far.  The 3rd photo was made by Crissy (daughter-in-law), I think it’s so stinkin’ cute!

He’s such a happy boy and Crissy is a great daughter-in-law!
lil man

lil man

lil man and haley

lil man
crissy, lil man and the girls

Crissy, Derek Jr., Roxy and Haley…the girls watched over lil man like one of their own…it was so cute.

Hope everyone is well 🙂  Have a great week y’all!

Posted in Condiments/sauces/etc. | Tagged , , , , , , | 35 Comments

Simple bird feeder and cleaning the grill

I seen both of these topics on Pinterest.  Now that I finally have unlimited internet I can get back to surfing Pinterest late at night when I can’t sleep!

I had picked up a cup and saucer at a yard sale probably two years ago.  Why did I buy a single cup and saucer?  Because they were pretty.  Yep, no logic to it, they were just pretty.  Then they sat in my front porch area collecting dust and no one ever saw them.  I came across this simple bird feeder and immediately knew what I was going to do with that cup and saucer.

At first I used super glue, but that only lasted a couple of days and the saucer came off.  Next I tried hot glue and it held strong for 2 weeks.  Finally, I asked the hubs (a mechanic) what to use and he suggested GOOP.  Worked like a charm and hasn’t come off in over a month!  (I found it at Ace Hardware, I also bought the marine kind that would be suitable for outdoor crafts).
Goop glue

An epoxy would also work, just make sure it is suitable for outdoor use.

And here it is, you simply glue the cup and saucer together.  Handle side obviously goes up to use as a hook.
bird feeder cup and saucer
Fill it with birdseed and hang it up.  I let mine dry overnight first.
bird feeder cup and saucer
Cute little project isn’t it?  With only 2 pieces, that you can pick up at sales all summer long 🙂  I hung mine on a shepherd’s hook.  I usually have hanging baskets on them but, I did bird feeders this year.

The next thing I seen on Pinterest was how to clean your grill grates the easy way.  The little work you have to do comes the next day.

I tested this on one of the three grill grates, to make sure it worked first.  I placed one grate in a trash bag, poured about a cup or two of ammonia in the bag and sealed the bag shut with a large rubber band.  You need it sealed tightly so the fumes stay in the bag and do their work.

Let it sit overnight.  The next day rinse it off and scrub lightly with a grill brush.  Voila!  It looks like new.
grill grates

I cleaned the one on the left hand side and put it on the grill so you could see the difference.  The next day I did the other two grates.  This works so good.  I know some of you may know this trick but, I had never heard of it, so I’m sharing in case some one else hasn’t heard of it.

Have a great week y’all, I know I will.  I picked up my daughter-in-law Crissy, and my grandson, Derek Jr., last night from the airport.  (First time meeting them both face-to-face).  It’s going to be an awesome 2 weeks!  And if you’re friends with me on Facebook, you’re going to be bombarded with pictures…ha!  My son didn’t get to come home because he has to work in the field for a month, which I will miss him, but I will spoil his wife and that grandbaby of mine for sure!
Lil man

This is the little man that I can’t wait to hug and kiss and snuggle with!  (How cute is that onesie too?!).

My blogs are scheduled ahead but, I may skip a day or a few of reading blogs because well…priorities first 🙂

Posted in Projects | Tagged , , , , | 19 Comments

Bloomin’ Onion Bread

After making the Cheddar Bacon Ranch bread, I seen this Bloomin’ Onion Bread.  Of course I had to make it,  my belly told me to and I listen to my belly 😉

I really liked both breads as they were but, if I were to make it again (which I will) I would make the Cheddar Bacon Ranch bread and add the green onions and poppy seeds to the butter/ranch mixture.  I think that would be an awesome bread!  That way you get the best from both recipes.

Oh I think I would add another tablespoon of the ranch dressing too.  I like it ranchy 🙂  Funny little story here.  My computer has autocorrect spelling on it.  It typed raunchy for ranchy…really computer?  Where is your mind at?!  Ha! 😉

Bloomin’ Onion Bread

1 unsliced loaf sourdough bread
8-12 oz. sliced monterey jack cheese
1/2 c. butter, melted
1/2 c. green onion
2 t. poppy seeds

Thinly slice your green onions.
Bloomin' onion bread

Using a bread knife, cut the bread about an inch from the bottom crust. Cut in both directions, about an inch apart.  Preheat oven to 350 degrees.
Bloomin' onion bread

Place slices of cheese in between cuts.
Bloomin' onion bread

Combine butter, onions and poppy seeds.  Drizzle over the bread.  You will want to gobble it down at this point but, we’re almost through!
Bloomin' onion bread

Wrap in a foil tent and bake for 15 minutes.  Unwrap and bake an additional 10 minutes or until cheese is melted.
Bloomin' onion bread

Like the last bread, I also served this with some ranch dressing on the side.  It will be gone in no time!  Enjoy it while it lasts 🙂

Original recipe here.

Have a great week y’all!

Posted in Appetizers | Tagged , , , , | 30 Comments

Pickled Cauliflower and Onions

This was in the June 2013 issue of Food Network Magazine.  I did things differently than they called for but, the picture in the magazine gave me the idea and inspiration for this.

I can my own salsa, pickles and barbecue sauce along with a few other things.  I love a good giardiniera mix but, find myself picking all the cauliflower out to eat that first.  So, when I seen this in the magazine I just had to make it.  Well, kind of 😉  I made it more along the lines of my pickle recipe though.

It’s perfect for summer time snacking and is healthy too….bonus!  It’s also easy on the pocket book and gets better by the day.  If you like pickled things, you’re going to enjoy this one 🙂

Pickled Cauliflower and Onions

1/2 head cauliflower, cut into bite-size florets
1 small vidalia onion, thinly sliced
2 cloves of garlic, thinly sliced
3/4 c. red wine vinegar
3/4 c. distilled white vinegar
3/4 c. water
2 T. sugar
kosher salt
1/2 t. ground coriander seeds
splash of lemon juice
1/8 t. alum
1/2 t. crushed red pepper
1/2 t. dill seed
1/8 t. dill weed
1/2 t. whole mustard seed

Add garlic, coriander seeds, crushed red pepper, dill seed, dill weed and whole mustard seeds to a quart sized mason jar.
pickled cauliflower and onion

Layer the onions and cauliflower into the jar next, leaving a half inch at the top of the jar.
pickled cauliflower and onions

Make the brine:  Combine the red wine vinegar, vinegar, water, sugar, salt, lemon juice and alum in a small saucepan.  Bring to a boil.  Remove from heat.
pickled cauliflower and onions

Pour hot brine over the cauliflower and onions.  Leaving a half inch head room at the top of the jar.
pickled cauliflower and onions

Cool for 45 minutes.  Put the lid and ring on the mason jar and refrigerate.  It will self seal overnight.  Before storing in the fridge I mix the jar up a bit too.
pickled cauliflower and onions

You can eat them the next day but, I like to leave them for at least a week, so they soak up more flavor.  Enjoy!

I took some of the pickled onions and put them in my tossed salad…very good and added a nice kick to it.

Yields: 1 quart

Have a great week y’all!

Posted in Appetizers, Condiments/sauces/etc. | Tagged , , , , , , | 36 Comments

Vegetable Pizza

This is a recipe I’ve made for years and I love it.  The hubs will not eat this, so lucky for me I get more of it!   It’s great as an appetizer for parties or get-togethers but, you can also have it as a main dish.

The vegetables you add are totally to your liking.  Add peppers or mushrooms if you’d like.  This is just the way I make it and I find most people like it this way.

It’s an easy, quick recipe that is great for weeknights when you have very little time, especially if you cut your veggies on the weekend.  It’s also pretty healthy.  I make this over and over in the summer, the entire pizza will last me all week.  No cooking for a week?  Yay! That’s what I like to hear, at least in the summertime.  I’d rather be outside in the garden or the pool than inside cooking.

Vegetable Pizza

2 tubes (8 oz. each) refrigerated crescent rolls
1 (15.5 oz.) container of Marzetti’s Dill Veggie Dip
2 t. horseradish
2 1/2 c. broccoli florets
2 1/2 c. cauliflower florets
1 bunch of green onions, thinly sliced
1/2 c. red onion, diced
3 large roma tomatoes, seeded and chopped
1 small can sliced black olives, drained and rough chopped
2 1/2 c. finely shredded sharp cheddar cheese

Unroll two tubes of crescent dough and press into an ungreased 15 x 10 baking sheet; seal seams and perforations.  Bake at 375 degrees for 8-10 minutes or until golden brown.  Cool completely on a wire rack.
Veggie pizza

While that is cooling mix the 2 t. horseradish with the dill dip.  Once the crescent dough has cooled, spread the dill dip over the entire crust.
Veggie pizza

Next add your veggies and olives.
Veggie pizza

Lastly sprinkle on the cheese.
Veggie pizza

Cover and refrigerate for at least one hour.  Cut into squares. Refrigerate leftovers if there are any.
Veggie pizza

Yield: 18 slices

Have a great week y’all!  I hope you’re enjoying the nice weather 🙂

Posted in Appetizers, Main dishes | Tagged , , , , , , | 34 Comments